Everything you need to know about FFUF
Summary
This guide is a large summary of the information security tool, FFUF. This is also paired with a video companion guide, shown below:
Table of Contents
- Other Sources / Credit
- Before we start
- What is FFUF, and What is it used for?
- Installation
- Basic Usage
- Recursion
- Extensions
- Fuzzing Multiple Locations
- Handling Authentication
- Threads
- Using Silent Mode for Passing Results
- Error Handling and Scan Tweaks
- Request Throttling and Delays
- Match Options
- Filter and Matches
- Sending FFUF scans via Burp Suite
- Advanced Wordlist Usage
- Handling Output
- Importing Requests
- Contributing to this guide
Other Sources / Credit
Understandably, putting this guide and the associated video content together has taken quite a long time (in the order of months, as it’s my first steps into video). Throughout that time some other great creators have put out other content, I heavily recommend watching. This content has inspired this project further, and I don’t think it would be what it is without their input. Notably, and a video I recommend watching in addition to my own for a more complete picture is Katie Paxton-Fear’s How to Use FFUF YouTube video.
Also, a shoutout to Jason Haddix, STÖK, hakluke, InsiderPHD, and Joohoi for helping answer my numerous questions and being a soundboard as I pulled this together.
Before we start
This guide is a reference point for using a web application security tool, FFUF. If you have a passion for this space, but the guide seems daunting, that doesn’t mean you can’t do this, it just means there’s some prerequisites to dive into first.
A great starting point is:
Health Adams - Linux for Ethical Hackers which will help you to understand the fundamentals of what’s happening here in the terminal, which should allow you to then make use of this guide.
In addition I also recommend Heath’s other content, available on their YouTube channel and I also recommend InsiderPHD’s content as a very good starting point.
Other notable creators well worth watching on your hacking journey include (but certainly aren’t limited to):
- Jason Haddix and his streams for more tooling insight.
- LiveOverflow for amazing insights into just how deep this rabbit hole can go
- Farah Hawa for a variety of hacking guides aimed at beginners
- The XSS Rat for a range of content from CTF’s to thought process
- STÖK for the best hacking community orientated content around, and by far the coolest / well centred creator to learn from.
- TomNomNom because learning to quit vim is vital, and you may learn some other tricks along the way
- Hakluke for direction on mindset, how to approach bug bounties, and industry insights.
And many more, that I’m sure to have missed, but not intentionally. I love you all.
What is FFUF, and What is it used for?
Who
Being an open source project, FFUF is maintained by the community however notably, it’s founder and principal maintainer, joohoi puts countless hours into driving the project forward. If you FFUF useful, you can support the work here: https://github.com/sponsors/joohoi
What
Firstly, the “what” is quite important. FFUF, or “Fuzz Faster you Fool” is an open source web fuzzing tool, intended for discovering elements and content within web applications, or web servers. What do we mean by this? Often when you visit a website you will be presented with the content that the owner of the website wants to serve you with, this could be hosted at a page such as index.php. Within security, often the challenges in a website that need to be corrected exist outside of that. For example, the owner of the website may have content hosted at admin.php, that you both want to know about, and test. FFUF is a tool for uncovering those items, for your purusal.
Where
FFUF is maintained as public open source, and can be found at: https://github.com/ffuf/ffuf
This means anybody who wishes to contribute to FFUF, can, provided the maintainer (joohoi) accepts and “merges” the contributed changes back to the main project.
Why
Particularly in the bug bounty scene, a lot of people have gravitated towards FFUF since its release. Whilst a good majority of this shift is likely down to the following of the crowd, there is a definite portion of the community who have made the change due to FFUF’s speed, flexibility, and ability to quickly integrate into outside tooling. In addition, the maintenance of the project is top notch, especially when compared to compeitive offerings which although similar in features, lack the same passion and speed to market of new features that FFUF has consistenty shown. All of these things considered, FFUF is a mainstay in any toolkit, and this guide aims to emphasize why that should be, and will likely continue to be the case.
Command Line Driven Applications
FFUF is a command line driven application that runs in the Linux Terminal, or the Windows Command Prompt, meaning that it doesn’t contain an interactive GUI, and is instead powered by inputted command line flags. Whilst this may seem more limiting at first, this lends itself to a higher degree of flexibility as you can make full usage of the tool over remote servers, as well as “pipe” (pass to / from) into and out of FFUF with other command line driven tools. This may feel limiting at first, however I encourage you to follow through this guide to make the most of FFUF, and as you become a more advanced user, you will be able to make the most of this flexibility.
Often, you’ll hear FFUF compared to tools such as dirb, or dirbuster, which whilst true at a certain level, isn’t a very fair comparison. Whilst FFUF can be used to perform directory brute forcing it’s true power lies in its flexibility, and a better comparison tool for FFUF should be made against something like Burp Suite Intruder, or Turbo Intruder. We’ll aim to cover that flexiblity further throughout this guide.
Installation
Install from Source
If you wish to install the latest stable build from the main branch of the ffuf project, you can do so with:
| |
After installing, ffuf will be available in ~/go/bin/ffuf.
Upgrading from Source
Much like compiling from source, upgrading from source is not much more complicated, with the only change being the addition of the -u flag. Upgrading from source should be done with:
| |
Kali Linux APT Repositories
If you’re using Kali Linux you’ll find FFUF in the apt repositories, allowing you to install by running sudo apt-get install ffuf, this will present an output similar to the following:
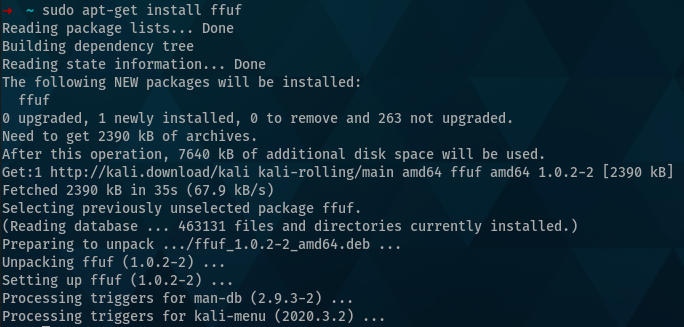
After installation, you can verify the version installed by using:
| |
If you also installed from source you’ll note that the version you’re operating is not the same as the version in your $GOPATH (~/go/bin). APT builds are normally older, but considered more stable builds of applications however can be less feature rich because of this.
Other Locations - Debian Unstable / SNAP, etc'
As it becomes more widely used, more ways to install FFUF are becoming available. FFUF currently flows into Debian Unstable, in addition to some flavours of Ubuntu who use those source. It’s also available in the Fedora official repositories, and a SNAP integration is currently underway as well.
Basic Usage
What is Directory Brute Forcing?
At its core, one of the main functions that people use FFUF for, is directory brute forcing. With that in mind, let’s fuzz! Without passing custom values (covered later in this course), FFUF will replace the value of FUZZ with the value of your wordlist.
What is a Wordlist?
What’s a wordlist? A wordlist is essentially a list of items in a text file, seperated by lines, that are tailor built around a purpose.
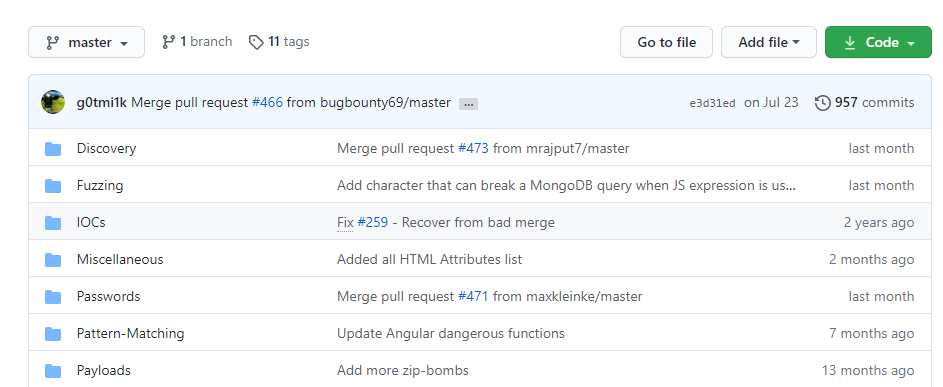
One of the best collections of wordlists, is SecLists. Curated by g0tm1lk, jhaddix and Daniel Miessler this collection has a wordlist for every occasion.
What is SecLists?
SecLists is managed on Github, so anyone can contribute to these lists and with such an active and well known repository, this leads to a flurry of beneficial contributions. To date, over 100 people have contributed to SecLists, with no sign of it slowing. As you further build in your Security knowledge, if you’ve made the most of SecLists I recommend aiming to give back, through a contribution, or by supporting Daniel, the project owner, through Github Sponsers, here: https://github.com/sponsors/danielmiessler.
What Wordlists should I start with?
If you’re getting started in security, and you’re unsure where to start with wordlists, a good/safe collection of lists are the discovery wordlists in SecLists, specifically:
- https://github.com/danielmiessler/SecLists/blob/master/Discovery/Web-Content/directory-list-2.3-small.txt
- https://github.com/danielmiessler/SecLists/blob/master/Discovery/Web-Content/directory-list-2.3-medium.txt
- https://github.com/danielmiessler/SecLists/blob/master/Discovery/Web-Content/directory-list-2.3-big.txt
As you progress in your journey, be sure to revisit this and look into tooling and workflow changes that allow you to both use more tailored wordlists for the asset that you’re approaching, as well as build custom wordlists around a target as you wish to get more information from it.
Your first Directory Brute Force
For this example, let’s create a simple wordlist. In this case, we’ll put the following items into it:
| |
Save this in the same location where you intend to run FFUF from, as wordlist.txt.
For this example, we’ll also brute force against this website, codingo.io. FFUF takes two basic arguments that we need to use here, the first, -u is the target URL (in this case, codingo.io). The second, is -w, which is the path to the wordlist file(s) that we wish to make use of. You can specify multiple wordlists in a comma delimited list, if you so require. We also need to put the word FUZZ where we want our wordlist items to be placed. In this case, we’re aiming to brute force for new directories, so we put this after the URL.
Putting this altogether, the command for our first directory brute force will be:
| |
When we run this, we should receive similar to the following:
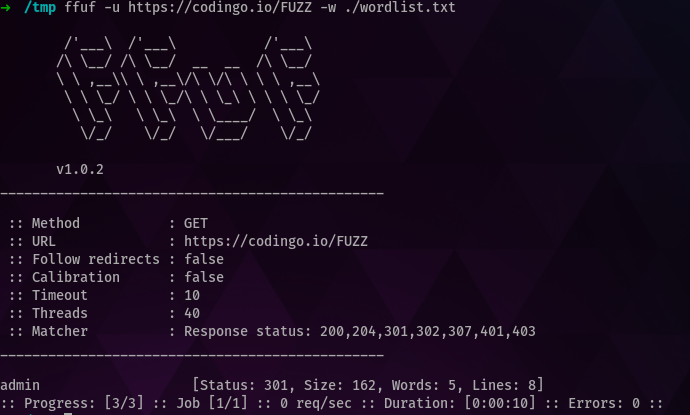
Note that from our three results, one has come back with a result. In this case, it’s come back with a 301 response code, which indicates a redirect is present here. As none of the other endpoints responded with this, instead opting for a 404 page not found response (which we don’t have set to match and display), we should investigate this. Doing so, shows the following:

Congratulations! You’ve just brute forced a website and discovered your first endpoint that isn’t present from the main page itself.
Recursion
Recursion is essentially performing the same task again, but in this context, at another layer. For example, in our item above, we identified an admin panel, but what if we want to scan further under that? One method, could be to scan again, but by changing our URL and fuzzing endpoint to the following:
| |
Now whilst this will acheive our goal, it doesn’t scale well. When bug hunting, we may find 20, 30, or even 100 directories, all which we want to explore at another level.
Enter, recursion. By setting the flag recursion we tell FFUF to take our scan, and apply another layer to it. A second flag, recursion-depth tells FFUF how many times to perform this action (for example, if we find another layer under admin, shoud we proceed to another layer or stop?). There are some caveats, however. In FFUF you can’t use customer fuzzing keywords with recursion, and you’re limited to the use of FFUF. Whilst this won’t matter for the vast array of applications it will limit usage when using pitchfork scanning modes, which we’ll cover later. This isn’t a significant issue, however, and just something to take a mental note of for future reference.
When we run this command again, but with the recursion flag, we can see the following:
| |
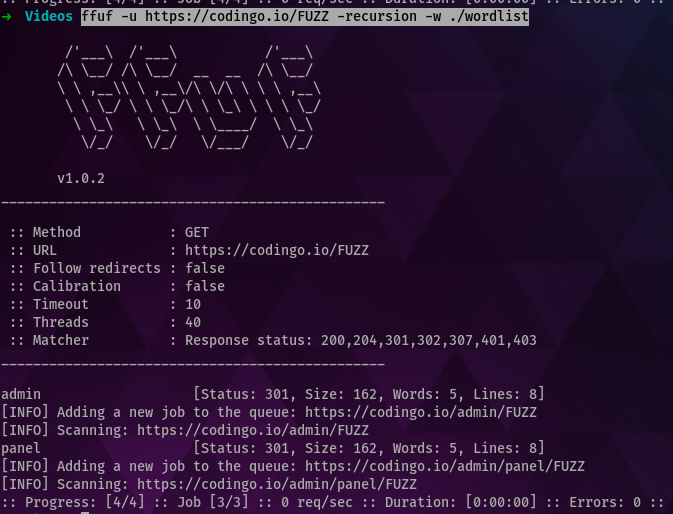
In this case, both items “admin” and a subpage under that “panel” were discovered.
Extensions
Often when you find a directorty you’re also going to want to look for file extensions of that. This can be invaluable for finding bugs when there’s a zip file, or backup file of the same name.
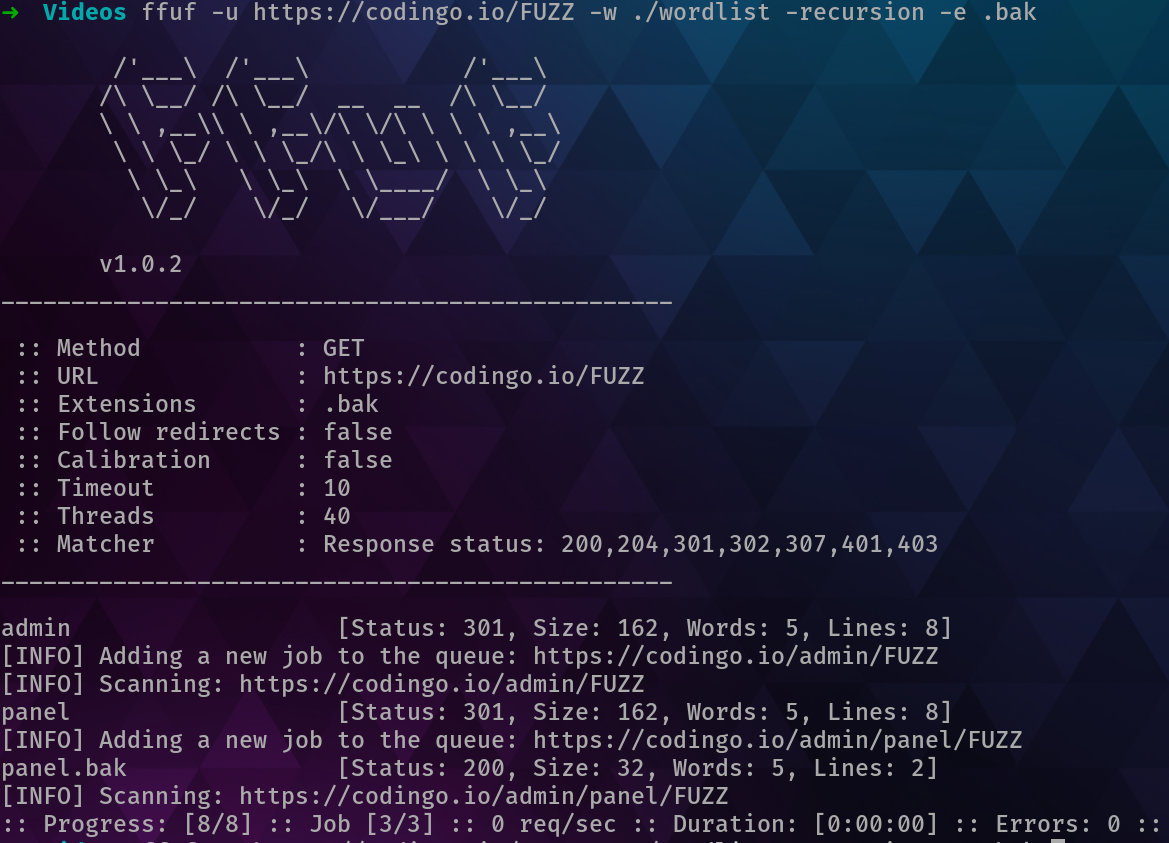
Extensions in FFUF are specified with the e parameter and are essentially suffixs to your wordlist (as not all extensions start with a .). For example, expanding upon our original scan with the following:
| |
This now presents new hits! As shown below:
Fuzzing Multiple Locations
By default, FFUF will only look for a single location to fuzz, donate by the term FUZZ. Reviewing our original example, this was the approach taken to FUZZ the directory name:
| |
But what if we want to fuzz multiple locations? This can be acomplished by comining the ability to define what a fuzz location would be with a wordlist, as well as using multiple wordlists.
For example, in the following we’re using the term W1 to fuzz our location, instead of FUZZ:
| |
This runs the same scan as our previous example, except W1 is now our insert instead of FUZZ. Now, let’s assume that instead of codingo.io we had identified multiple websites we wanted to check over at the same time. For that, we could create a wordlist of all of the domains we wanted to test, and use the following:
| |
This would scan each of the domains in our domains.txt files using the wordlist from wordlist.txt, allowing us to run at scale without needing the use of outside scripting or applications.
The order of the wordlists control in what order the requests are sent. In clusterbomb mode (default) ffuf will iterate over the entire first wordlist before moving on to the second item in the second wordlist.
Why does this matter you wonder? Let me give you an example:
Lets say we have a wordlist with 1000 domains domains.txt and a wordlist with 1000 directories wordlist.txt.
If we run:
| |
ffuf will try every directory for the first domain, then every directory on the second domain. When running with many threads, this means sending 1000 requests to the same server in a very short amount of time. This often leads to getting rate-limited or banned.
If we on the other hand swap the order of the wordlists and run:
| |
ffuf will try the first directory on all domains, before moving on to the next directory and trying that on all domains. This way you can send more requests without overloading the target servers.
Wordlist Parameter Bug
In older versions of FFUF there is a bug here whereby the w flag needs to be made use of multiple times for this to work as intended. If you receive the error:
Encountered error(s): 1 errors occurred.
* Keyword W1, defined, but not found in headers, method, URL or POST data.
Then you should instead either upgrade FFUF to the latest version, or use the w flag multiple times, like so:
| |
More information can be found here: https://github.com/ffuf/ffuf/issues/290
Handling Authentication
Cookie Based Authentication
Often when performing a scan you will want to brute force behind an authentication point. In order to do this, FFUF provides the b flag for you to pas cookie data. These aren’t limited to authentication based cookies, and any area of the cookie (from names to values) can also be fuzzed with a wordlist for additional discovery.
Header Based Authentication
If authentication for the application is via HTTP header-based authentication then the H flag should be used. As with the b flag, this can be used to pass or fuzz any headers, and not just for passing required elements for authentication.
In addition to authentication, or fuzzing points, the H flag can also be utilised in situations where you’re required to “call your shot” by specifying a custom header for a client, or Bug Bounty engagement, so the defensive teams of those organisations can identify your traffic.
More Complex Authentication Flows
Occasionally, you’ll come accross authentication flows or fuzzing situations Burp Suite can’t provide. In those cases, I suggest creating an additional interface in Burp Suite and making use of Burp Suite Macros to acomplish this. Instructions for doing so can be found further on within this guide.
Threads
By default FFUF will use 40 threads to execute. Essentially, this means that FFUF will start 40 seperate processes to execute the commands that you’ve provided. It may be tempting to set this much higher, but this will be limited by the power of your system, and the destination system you’re scanning against. If you’re in a network environment, such as HackTheBox, or OSCP then setting this higher may not pose much of an issue. If, however, you’re working on a production system over the internet then you are likely better off spending time tailoring the flags you’re passing to FFUF, and keeping your thread count lower, than trying to acheive a quicker result merely with raw thread count. Various flags you can use to better tailor your requests can be found further throughout this guide.
Using Silent Mode for Passing Results
By default FFUF will strip colour from results (unless you enable it with the -c flag). This makes results easy to pass to other application, for additional work. One challenge here, is the header information, essentially:
| |
and the footer:
| |
To remove this, and only show results that line up with the matcher filters, you can use the silent flag, -s. This flag will enforce only successful hits to be shown. For example, our command from earlier, if exapnded with -s becomes:
| |
Which will then only show the result:
adminAs that responds with a 301 request, which is within our matcher filters.
Error Handling and Scan Tweaks
Automatically Calibrate Filtering
The ac flag in FFUF can be used to automatically calibrate filtering of requests. This flag tells FFUF to send a number of preflight checks before brute forcing begins and to quantify common elements of those requests for further filtering. For example, FFUF may send random strings, and if each of those responses were a 200 response code, with a common content length, then that content length would be automatically filtered from future results.
Custom Automatic Calibration Filtering
In addition to the ac flag, FFUF allows you to provide the seed request to build autocalibration against, instead of using pre-flight checks. A good example where this shines, is with Virtual Host Scanning. When checking for Virtual Hosts (VHosts), you are seeking responses that don’t match the host request. If we were to do that with acc, we could use the following:
| |
This would send a preflight check to our target to capture the content-length and response code of www, and then highlight only responses which have a different content length that return from our wordlist. This greatly helps to eliminate false positives, and in these types of cases is more accurate than ac which would use random strings to capture the response, and is unlikely to be as accurate for this type of (and other types of) fuzzing activity.
Immediately Stop on Error Case
FFUF can force stop once an error is received, using the sa flag. This overrules any of the other error condition flags (se and sf) as their thresholds would never be met.
Stop on Spurious Errors
FFUF has a flag to allow jobs to automatically stop when a percentage of the recent requests have thrown an error. This flag is se, and will end the job if the last 50 requests have thrown a 403 response code 95% of the time, or if 20% of the responses have been a 429 response code. This can be safer than the flag sf, which will only stop if a portion of the entire request pool have errored, and not just recent requests. These limits may change over time, and are referenced here, should you wish to manually review them: https://github.com/ffuf/ffuf/blob/master/pkg/ffuf/job.go#L382-L407
Request Throttling and Delays
With production hosts, or under various testing conditions you will need to throttle your responses. When these conditions are required, FFUF provides a number of options.
Delay Between Requests
The p flag specifies the seconds of delay between requests. This can be a range, or a set figure. For example, a p value of 2 would enforce a 2 second delay between each request, whilst a p value of 0.1-2.0 would enforce a random delay between 0.1-2 seconds.
Limited Max Requests/second
As FFUF is a multi threaded application, you can easily end up overwealming a destination target with too many requests. In order to control this, you can specify a maximum number of requests that can be sent per second. This can be set with the -rate flag. For example, if you wish to limit to 2 requests per second, then you would specify -rate 2.
Match Options
Match on Response Code
There are a variety of predescribed matching options in FFUF, the most common one that you’ll find yourself using is mc, which matches the response code. In many cases, you’ll want to change this to limit to only 200 requests, to help isolate the results to content that you’re seeking.
Match on Regular Expression
In some cases, however, you may be fuzzing for more complex bugs and want to filter based on a regular expression. For example, if you’re filtering for a path traversal bug you may wish to pass a value of -mr "root:" to FFUF to only identify successful responses that indicate a successful retreival of /etc/passwd. Such cases are quite common, and highlight some of the power that FFUF brings into fuzzing that competitive offerings are not yet able to match.
Filter and Matches
As useful as matches are, filters being the inverse of matches can be just as, if not more useful. When returning the results of a page that has a sink (a location where your source, or wordlist item is reflected in the page) within the response, it can be more useful to filter the number of words in a page, rather than filter by content length. For this purpose, FFUF provides fw, or filter words. If you can identify the number of words commonly in the response, you can apply this filter to remove any results that have your content length. If words aren’t specific enough, you can also filter on the number of lines within the HTTP response, using fl.
Much like filters, you can also filter based on content length (fc) to remove response types from the results. This can be especially useful where you want to first filter for all defaults, which includes the 301 response code, and then filter this response code out from the results to see more specific responses.
Sending FFUF scans via Burp Suite
For a variety of reasons, you’ll often find yourself wanting your FFUF scans to be sent via Burp Suite. Notably, there’s a few ways to acomplish this goal, and it’s important to understand each of them, and apply the right one for your use case.
Locally, Using Replay Proxy
FFUF has a command within it, replay-proxy to dictate. This will retoute successful commands (ones that hit your matches, and not your filters) to Burp Suite proxy for further investigation. Notably, this does mean that you’re doubling your requests, and this should be used in situations where it makes sense to do so.
If for whatever reason (such as engagement terms) you need to send all information via Burp Suite, and not just successful traffic, then you can instead use x which will replay all requests via a Burp Suite project, regardless of whether they line up with FFUF filters/matches or not.
Using an Interface
Occasionally, you’ll encounter situations where you need all of your FFUF (or another tools) traffic to be send via Burp Suite over a Burp Suite Interface. This could be due to engagement logging (required by the firm you’re testing for/against), or due to a complex authentication schema that Burp Suite is better positioned to handle. Personally, I’ve also found this useful for fuzzing various elements (such as CSRF tokens) in conjunction with Burp Suite Macros. Whatever the use case, the method for doing this is quite simple. Firstly, we need to go to Burp Suite and setup a second interface, you can do this under proxy->options->add
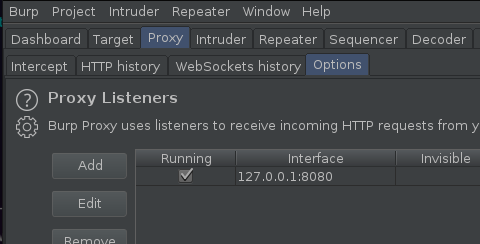
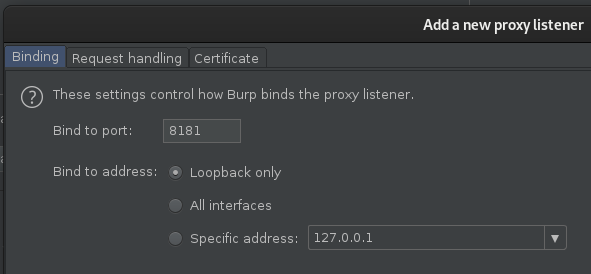
Under binding, set a port, for the second interface I prefer to use 8181 (as 8080 is the default and I find this easy to recall).
Under the request handling flag, set “Redirect to host” and “Redirect to port” to match that of our destination target:
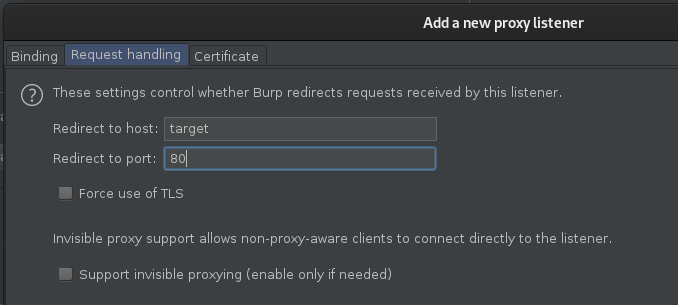
After we’ve done that, leave other settings the same and click ok. We can then target https://127.0.0.1:8181 with any of our tools, including FFUF, and it will automatically redirect to the destination target. This means, instead of using http://target.com/path/FUZZ in FFUF to focus on our target, we can use https://127.0.0.1:8181/path/FUZZ. Everything will work as it did before, except the requests are being sent to, and out from Burp Suite.
Be cautious when using this approach on large wordlists, as Burp Suite will store the history within your associated project, and passing large fuzzes via Burp Suite is likely to cause your project file to become bloated, and unwieldy quickly.
Remote VPS Traffic via a Reply Proxy
When using a remote VPS you’ll occasionally hit decisions in your testing that would be aided by using a local version of Burp Suite. To help aid in this, when fuzzing with FFUF you can open a reverse SSH tunnel and combine it with reply-proxy on your remote VPS to replay it over the remote port, to your local Burp Suite instance.
First connect to your remote VPS over SSH server using:
| |
And then run FFUF with the following:
| |
Since we bound port 8888 to relay over our reverse SSH tunnel to our remote burp instance, on port 8080, this will then replay back in Burp Suite.
Advanced Wordlist Usage
When using multiple wordlists, FFUF has two modes of operation. The first, and the default, is clusterbomb. This takes both wordlists and tries all possible combinations of them, and is best for brute forcing operations. By default FFUF will use the clusterbomb attack mode, however you can specify other modes (for now, just pitchfork and clusterbomb) using the mode flag.
For example, let’s assume we had a wordlist called “users”, with two users, “codingo” and “anonymous”. In addition, we’ll assume we have a wordlist “passwords”, with two items, “hunter1”, and “password”. In clusterbomb mode, all combinations of these would be tried, resulting in the following output.
Alternatively, FFUF provides another mode called “pitchfork”. This mode is intended for when you want to use wordlists in series. For example, let’s assume that you have a list of passwords, that go with a list of users and want to fuzz via a username and parameter endpoint. In this example, the password “hunter1”, would be tried with the user “codingo”, and the password “password” would be tried with the user “anoymous”, however that would be the end of the operation, and further combinations would not be tried.
Each has its own use cases, and it’s important to know how to use both, however if you’re unsure which to use, it’s best to stick with the default, clusterbomb.
Clusterbomb
Most useful for a brute-force attack style, the clusterbomb will try all combinations of payloads. As Burp Suite Intruder operates with the same kind of wordlist approaches, I’ve found this is best explained by Sjord, here. To paraphrase Sjord, essentially the clusterbomb tries all possible combinations, while still keeping the first payload set in the first position and the second payload set in the second position. As shown in the following example:

Here we can see that the first payload position is used in position one, 456. And the second, in postion two, <br. The first payload is then rotated, whilst the second isn’t, until the first list has been exhausted at which time the second list continues through the same operation. Operating in this style ensures that all possible permutations are tested.
Pitchfork
Much like the Clusterbomb approach, I’ve found the Pitchfork style of fuzzing is also best explained by Sjord, here. To paraphase, the pitchfork attack type uses one payload set for each position. It places the first payload in the first position, the second payload in the second position, and so on. This attack type is useful if you have data items that belong together. For example, you have usernames with corresponding passwords and want to know whether they work with this web application.

As you can see when compared to the clusterbomb atack, the pitchfork attack works the wordlists in series. Not all combinations will be reached, but the use case for these is that they aren’t intended to and doing so would be a waste of requests.
Handling Output
HTML Output
Using Silent and Tee
If you want to print results only, without all of the padding, the s flag, or silent mode, works great for this. For example:
| |
With our original example, will only output admin, as it’s the only successful match. This can also be useful to pass to other tools, however when doing so I suggest also using tee. The tee command will output the results to console, whilst also redirecting it as stdout, allowing other applications to consume it. For example, the following:
| |
Would output to the console and write to output.txt. This is a useful trick for a number of tools, including those that don’t stream output, to allow you to see results in realtime, whilst also streaming them to a file.
Importing Requests
On of the easiest ways to work with complex queries is to simply save the request you’re working with from your intercepting proxy (such as Burp Suite), set your fuzzing paths, and then import it into FFUF for usage. You can do this with the request flag in FFUF, as explained below.
Going back to our original fuzzing example, let’s assume we visited codingo.io in Burp Suite, and we captured the following request:
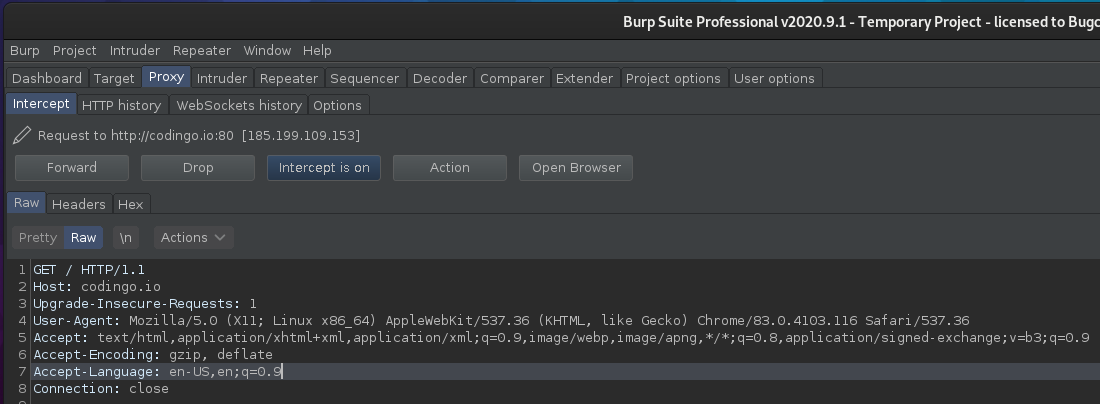
We can right click in the request, and select Copy to File:
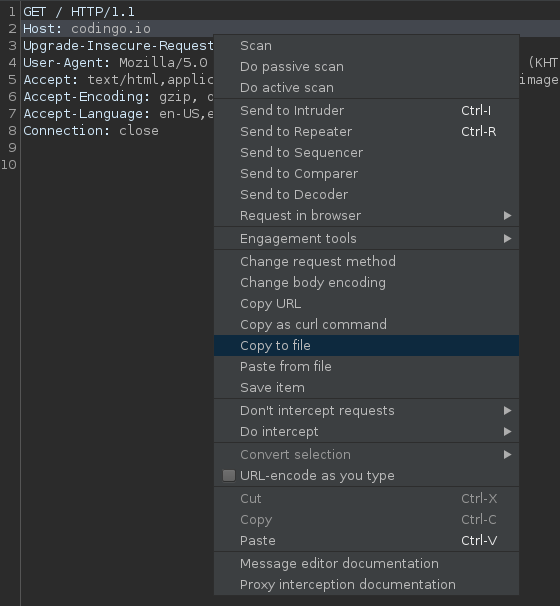
Be sure not to select Save item as that will save this in a format known only to Burp Suite, and not of use to FFUF.
Once we’ve saved the file, we then need to open it in our favorite editor, and add our fuzzing points. For this example, I want to brute force items at the top level of the codingo.io domain and so I’m adding FUZZ on the top line, as shown below:
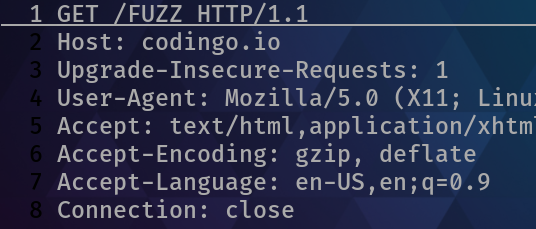
We can then open our request in FFUF, and instead of passing cookie information or a URL, we can use request to feed it the information in our saved request. In this case, this would look like the following:
| |
Contributing to this guide
This guide is open source, maintained on Github. If you’d like to contribute to this guide, or to make a correction, you can do so here: https://github.com/codingo/codingo.github.io
Contributors
The following authors have contributed to this guide:
| Date | Contributor | Description | |
|---|---|---|---|
| 17 Sep 2020 | codingo | https://twitter.com/codingo_ | Initial Draft / Publication |
| 28 Sep 2020 | p4fg | N/A | Added additional hints on fuzzing multiple domains |
d0zMOQpSawchaptHNMQAvMtgz7dPHHvs
